After living in our place for almost three years, we decided earlier this year, that we want this to be our permanent home. Until now, we really debated moving to the suburbs versus staying downtown. There are some things that we know would be easier in the suburbs (think schools), but overall, we are committed to living and raising our family downtown.
With this new level of commitment, we decided that we needed to make a few changes to make this space work for us long term. Obviously, we can't add square footage to our condo unit, but we can increase storage, better utilize our space, etc. In deciding this, we started and finished decorating the kids' room. Next, we started looking at ways to reduce our energy bills, so we started with insulated curtains. In doing this, we decided that we needed to update the master bedroom. Join us over the next couple of months as we finish the master bedroom. We have big plans and ideas, but we will need to save up some money before completing the project, so we'll document step-by-step our projects until the end.
Showing posts with label Designing. Show all posts
Showing posts with label Designing. Show all posts
Tuesday, December 14, 2010


Tuesday, November 9, 2010
kids' artwork
The final decorating project for the kids' room revolves around the great artwork that comes home from school. Every week, our daycare sends home cute art projects that the kids complete. Some of these go into the scrapbook (or will eventually when I finally get to starting that). However, I really wanted to be able to display the artwork for a bit. The fridge is not an option because ours is stainless steel and does not hold magnets.
I bought these frames at Michael's for around $7.99 each and used 40% off coupons for each, so with tax $5.14 each. I decided to paint the back of the shadowbox in magnetic paint ($8 for a can). This was painted with three coats of magnetic paint.

Then I painted one red and one blue to match the room.

I added some scrapbook paper for less than $3 total that matches the color scheme of the room to put into the shadowbox. Here's the end product with two magnet clips for the artwork.

Project #2 done - kids' room complete! Here is a rundown of the kids' room progress and some pictures of the final project. Hope you enjoyed the journey. I enjoyed breaking down the process of completing the kids' room.
On to project #3 - scrapbooking... I have put this off for three years, so here's to hoping that I can get this all cleaned up.
I bought these frames at Michael's for around $7.99 each and used 40% off coupons for each, so with tax $5.14 each. I decided to paint the back of the shadowbox in magnetic paint ($8 for a can). This was painted with three coats of magnetic paint.

Then I painted one red and one blue to match the room.

I added some scrapbook paper for less than $3 total that matches the color scheme of the room to put into the shadowbox. Here's the end product with two magnet clips for the artwork.

Project #2 done - kids' room complete! Here is a rundown of the kids' room progress and some pictures of the final project. Hope you enjoyed the journey. I enjoyed breaking down the process of completing the kids' room.
On to project #3 - scrapbooking... I have put this off for three years, so here's to hoping that I can get this all cleaned up.
Sunday, November 7, 2010
modern wall circles
When I first saw these circles, I loved them, especially after discovering the theme for the room. These circles would be perfect painted in multiple colors on the wall. However, I couldn't choke down the $33 for a set of four, considering I was looking at needing at least four sets. It would still be around $130, but I didn't love the circles that much.

I looked for weeks to find a deal on the paintable circles and then I found a post about DIY paintable circles, using embroidery hoops. So, here's my play-by-play on making this wall art.
I picked up a variety of hoops in different sizes from Joann's Fabric for around $20 total. I used only the interior of the hoop for the circle.

I painted the hoops in red, blue, yellow and brown to match the bedding. Then, set them out on the floor to see what would work best on the wall, however, I changed a few things as I was putting them on the wall. Here's the layout on the floor:

To mount the hoops to the wall, I drilled at approximately 45 degree angle through the top and bottom of the hoop and then used a small nail through each drilled hole.
Here's the final result on the wall.

One project left to go for the kids' room and it's complete, but not hung on the wall yet.
I looked for weeks to find a deal on the paintable circles and then I found a post about DIY paintable circles, using embroidery hoops. So, here's my play-by-play on making this wall art.
I picked up a variety of hoops in different sizes from Joann's Fabric for around $20 total. I used only the interior of the hoop for the circle.

I painted the hoops in red, blue, yellow and brown to match the bedding. Then, set them out on the floor to see what would work best on the wall, however, I changed a few things as I was putting them on the wall. Here's the layout on the floor:

To mount the hoops to the wall, I drilled at approximately 45 degree angle through the top and bottom of the hoop and then used a small nail through each drilled hole.
Here's the final result on the wall.

One project left to go for the kids' room and it's complete, but not hung on the wall yet.
Tuesday, October 19, 2010
Naming Art
One art project done, three to go. This next art project is focused on the kids' names. I purchased these letters at Michael's for around $30 total and then purchased some additional paint.

At first, I wanted to decorate the letters with circles and stripes, but after looking around the room and all of designs that would be up, I decided to paint each name in one solid color.
Here's Nathan's name finished in blue.

Here's Madyson's name complete in red.


At first, I wanted to decorate the letters with circles and stripes, but after looking around the room and all of designs that would be up, I decided to paint each name in one solid color.
Here's Nathan's name finished in blue.

Here's Madyson's name complete in red.

And the names together on the wall.

Two projects to go to finish the kids' room.
Friday, October 15, 2010
Furniture... last minute arrival
Our furniture finally arrived about two hours after I went into labor. That's right - two hours after. We were at home getting everything cleaned up for the furniture to arrive the evening before Madyson was born when I went into labor. I knew that I had some time to get to the hospital, so we decided to wait for my mom to arrive to watch Nathan and hoped that the furniture would arrive before we had to go to the hospital. As our luck would have it, my mom arrived minutes after the furniture arrived, so it was chaos. However, I really wanted to get all the furniture out of the boxes and get rid of the cardboard and styrofoam, so we unpacked the dressers and nightstand. Then, we finished getting packed, slept for a bit, headed to the hospital, and Madyson was born about 14 hours after we had the furniture unpacked.
Thanks to my dad and Nathan for getting the crib together while we were at the hospital. We absolutely love the furniture. Find out how we picked this furniture here and the bedding here.


Thanks to my dad and Nathan for getting the crib together while we were at the hospital. We absolutely love the furniture. Find out how we picked this furniture here and the bedding here.


Getting closer to finishing the kids' room.
Bunk beds
After buying the lumber back in March and April, the bunk beds are finally complete. My husband and dad built the bunk beds from the plans at Knock Off Wood. They started working on the beds at the end of May and continued to figure out different ways to ensure that the bunk beds could adjusted to two separate beds as well.
Here is the long awaited pictures of the final product (including the new bedding):


Here's to getting the room complete... checking off item #2.
Here is the long awaited pictures of the final product (including the new bedding):
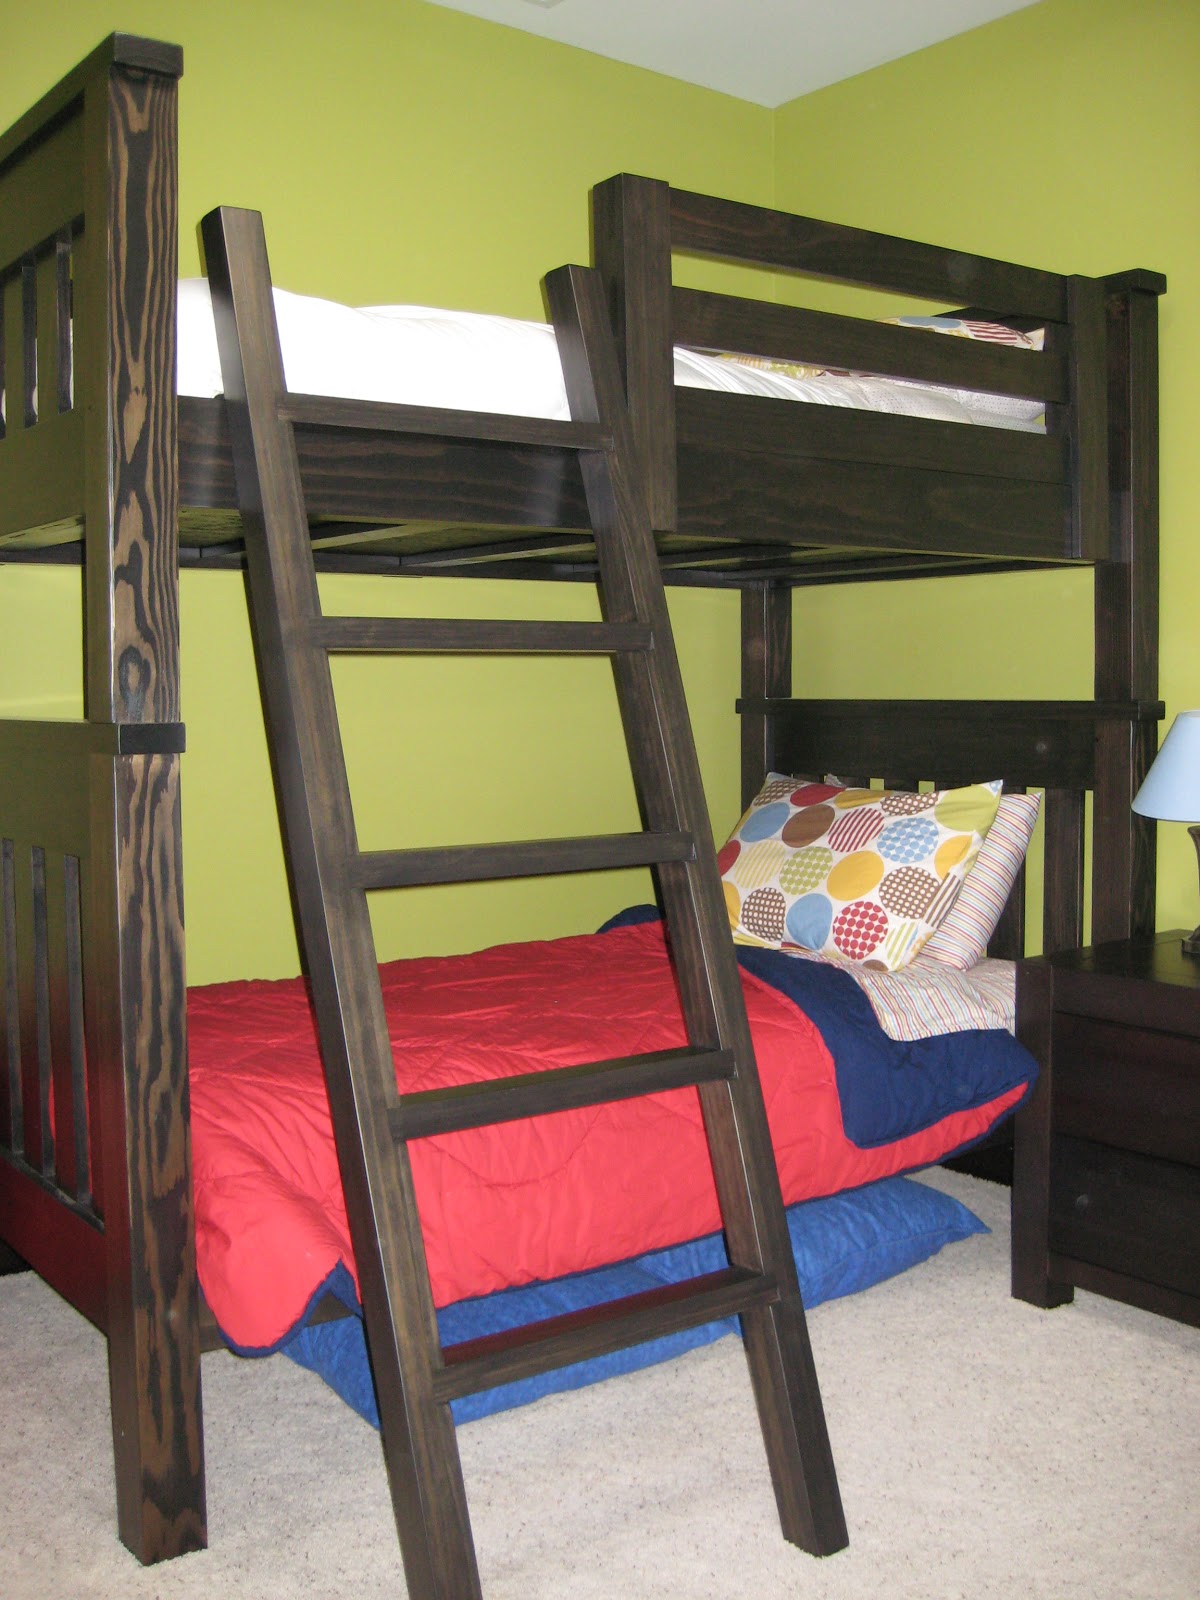

Here's to getting the room complete... checking off item #2.
Sunday, October 10, 2010
Wall Art
Here is the first project for some wall art for the kids room. I bought two 12"x12" canvases at Michael's last week for $4.79 each. Then six small bottles of paint for $.85 each.

I started by painting one canvas yellow for Madyson and one blue for Nathan.

I let Nathan start by painting his canvas with green and orange. Then, we added his hand prints in red.

For Madyson, I did her foot prints in purple and green. I wanted to do her hand prints, but I thought it would be too difficult to keep her hands open.

After both canvases were dry, I took paint markers (which I had previously purchased for a different project) and added their names to the top of the canvas.
Total for this project was around $15, but I have lots of paint left over for some additional projects. Once I have the room complete, I will add pictures with these on the wall.

I started by painting one canvas yellow for Madyson and one blue for Nathan.

I let Nathan start by painting his canvas with green and orange. Then, we added his hand prints in red.

For Madyson, I did her foot prints in purple and green. I wanted to do her hand prints, but I thought it would be too difficult to keep her hands open.

After both canvases were dry, I took paint markers (which I had previously purchased for a different project) and added their names to the top of the canvas.
Total for this project was around $15, but I have lots of paint left over for some additional projects. Once I have the room complete, I will add pictures with these on the wall.
Wednesday, August 18, 2010
Paint reveal
When we decided to paint the kids’ room, I looked through hundreds of pictures online to find a neutral, modern, kid friendly design. I discovered that: 1. most design were only for infants or only for kids, but not both, and 2. most were not gender neutral. That lead to the problem of trying to figure out ways to make this design work. The first thing we decided on was that the room would be green. After looking at hundreds of paint samples and buying some neon green colors, we decided that the best thing to do would be to pick out the bedding first. As you can see from this, the bedding has a circles and stripes theme with lots of gender neutral, but fun colors. Although it may look like this was easy, we spent a lot of time trying to find something that worked within our budget.
However, when the bedding arrived, we were thrilled. It was perfect. So last Thursday night, I looked at the changing pad covers and really liked the colors, including the green. On Friday morning, my husband went to Lowe’s to pick up the paint. He was reluctant at first, given that I am 7 months pregnant, a perfectionist, that is sometimes very difficult to please (if my husband were writing this he would probably say that I am always difficult to please while pregnant). But I reassured him that he just needed to be sure that we could have the paint re-tinted if it was not what we wanted. I did some research online and found that Lowe’s had a no-VOC, low odor paint that could be tinted. Here is the paint that we picked up in a custom-tinted color to match the bedding. The wall color is the previous wall color in the kids' room.

So off he went to pick up the paint. He called mid-afternoon to let me know that he started painting and he really liked the color. I was excited to see what it looked like. When I came home from work around 6:00 that evening, I did not expect that he would be almost finished with the first coat. The following morning, he finished the second coat.

As you can see, it looks amazing. The lesson learned on this adventure is that we did lots of research, tried different colors, but in the end needed some inspiration for the final color. We think this color will make the furniture and accessories pop, but now I can’t wait for our furniture to arrive (only 3 more weeks, hopefully). However, the bunk beds should be complete within the next couple of weeks, which will make a huge difference in how the room looks. Next step, buying the DIY accessories, creating the art, and placing it in the room. Stay tuned for these kid-friendly, fun projects.
Oh, I almost forgot, the total came to just over $48 for 2 gallons of no-VOC and low odor paint. Also, Lowe’s was great with helping my husband get everything in order for painting.
Cutting the crust off before the baby arrives, so we can enjoy every minute in the kids’ room with our soon-to-be family of four.
However, when the bedding arrived, we were thrilled. It was perfect. So last Thursday night, I looked at the changing pad covers and really liked the colors, including the green. On Friday morning, my husband went to Lowe’s to pick up the paint. He was reluctant at first, given that I am 7 months pregnant, a perfectionist, that is sometimes very difficult to please (if my husband were writing this he would probably say that I am always difficult to please while pregnant). But I reassured him that he just needed to be sure that we could have the paint re-tinted if it was not what we wanted. I did some research online and found that Lowe’s had a no-VOC, low odor paint that could be tinted. Here is the paint that we picked up in a custom-tinted color to match the bedding. The wall color is the previous wall color in the kids' room.
 |

So off he went to pick up the paint. He called mid-afternoon to let me know that he started painting and he really liked the color. I was excited to see what it looked like. When I came home from work around 6:00 that evening, I did not expect that he would be almost finished with the first coat. The following morning, he finished the second coat.

As you can see, it looks amazing. The lesson learned on this adventure is that we did lots of research, tried different colors, but in the end needed some inspiration for the final color. We think this color will make the furniture and accessories pop, but now I can’t wait for our furniture to arrive (only 3 more weeks, hopefully). However, the bunk beds should be complete within the next couple of weeks, which will make a huge difference in how the room looks. Next step, buying the DIY accessories, creating the art, and placing it in the room. Stay tuned for these kid-friendly, fun projects.
Oh, I almost forgot, the total came to just over $48 for 2 gallons of no-VOC and low odor paint. Also, Lowe’s was great with helping my husband get everything in order for painting.
Cutting the crust off before the baby arrives, so we can enjoy every minute in the kids’ room with our soon-to-be family of four.
Thursday, July 29, 2010
Circles and Stripes
After searching many blogs and interior design websites, I have decided that the theme in the kids’ room will be circles and stripes. I have found what I think will be perfect bedding from Target.com. However, I need to wait for the bedding to arrive to match or coordinate green paint for the walls. Hopefully, it will arrive soon, so we can get moving on the painting. The bunk beds are ready for the final sanding which will happen over the next two weeks and then staining, so they should be complete by the end of August.
I decided to order two sets of twins sheets, one stripes and one circles for the bunk beds. I am still determining what color comforter I will pair with these, so more to come on that. For the bunk beds, I am going to use this curtain to make throw pillows. I am thinking maybe a couple 16x16 pillows and 20x20 pillows, so the kids can lay on these in the room. The pillows should add lots of color to the room too. As for the bunk beds, more to come of the comforters and making the pillows.
As for the bedding, we decided that we would reuse most of the bedding that we had with our son, but I couldn’t resist picking up a new bed sheet to match the theme of the room. The bed sheet is the same as one for the bunk beds, so the two areas should tie together well. We also decided to pick up this matching changing pad. If there is any extra fabric from the curtains, I might also make a blanket for the crib. I ordered two curtains, so I am hoping there is some extra, depending on how many pillows and the size of each pillow.
So far that’s what we have decided on for the bedding, but there will be more to come as the room comes together.
So, how did we decide on this bedding?
I looked through a lot of pictures to find modern ideas that fit a neutral, modern kids’ room. Circles and stripes were a bit theme through many of the pictures that I found, but the challenge is mixing these together in a cohesive way. While searching bedding at Target.com, this set was perfect. The set has circles and stripes in one pattern, but I could also find coordinating striped bedding. It helped that the bedding was available in both twin size bedding and infant crib bedding.
There are many ways that you could go. We started by determining that we wanted to paint the room green, but we needed to find bedding that included green so we could coordinate that color. We looked for inspiration and found that circles and stripes were fun and modern. We used this pattern in ways that we can easily change – bedding, accessories, but will have a major impact on the room. However, another idea would be a specific color and finding fun accessories to go with this.
Over the next couple of weeks, I will post on how we tied the circle and stripe theme to the decorations throughout the room, all while putting personal touches on the art.
Oh, and on this order, I spent around$119 $99 (I forgot that I ordered an extra set of sheets that I ended up returning), but saved over $40. Overall, well below our budget. Crust is cutoff…
I decided to order two sets of twins sheets, one stripes and one circles for the bunk beds. I am still determining what color comforter I will pair with these, so more to come on that. For the bunk beds, I am going to use this curtain to make throw pillows. I am thinking maybe a couple 16x16 pillows and 20x20 pillows, so the kids can lay on these in the room. The pillows should add lots of color to the room too. As for the bunk beds, more to come of the comforters and making the pillows.
As for the bedding, we decided that we would reuse most of the bedding that we had with our son, but I couldn’t resist picking up a new bed sheet to match the theme of the room. The bed sheet is the same as one for the bunk beds, so the two areas should tie together well. We also decided to pick up this matching changing pad. If there is any extra fabric from the curtains, I might also make a blanket for the crib. I ordered two curtains, so I am hoping there is some extra, depending on how many pillows and the size of each pillow.
So far that’s what we have decided on for the bedding, but there will be more to come as the room comes together.
So, how did we decide on this bedding?
I looked through a lot of pictures to find modern ideas that fit a neutral, modern kids’ room. Circles and stripes were a bit theme through many of the pictures that I found, but the challenge is mixing these together in a cohesive way. While searching bedding at Target.com, this set was perfect. The set has circles and stripes in one pattern, but I could also find coordinating striped bedding. It helped that the bedding was available in both twin size bedding and infant crib bedding.
There are many ways that you could go. We started by determining that we wanted to paint the room green, but we needed to find bedding that included green so we could coordinate that color. We looked for inspiration and found that circles and stripes were fun and modern. We used this pattern in ways that we can easily change – bedding, accessories, but will have a major impact on the room. However, another idea would be a specific color and finding fun accessories to go with this.
Over the next couple of weeks, I will post on how we tied the circle and stripe theme to the decorations throughout the room, all while putting personal touches on the art.
Oh, and on this order, I spent around
Tuesday, July 27, 2010
Furniture
We are still working through getting everything ready for the kids' bedroom, but we have decided on furniture.
We agreed on espresso colored furniture to tie in with the rest of our place. Since our first crib was a drop-side, we purchased a new crib. I searched high and low to find a crib that was modern, but good quality. The lesson we learned since having our son is that cribs are expensive, but usually not high quality.
I found Knock Off Wood through one of the many blogs that I read and really like these bunk beds. Initially I thought that with a little help from my husband and sisters, I would be able to build these. So we ventured to Home Depot, where I fell in love with some high quality wood, which was a little more expensive than I had budgeted. So, on to plan B – a call to my dad. Five months later, we have bunk beds that are done a thousand times better than I would have ever been able to do. I will have pictures to post soon. We are going to stain these in espresso to match the other furniture for the kids room.
Now, onto the crib. For about five seconds, I thought about building one, or having my dad build one, but that was quickly subsided when my husband reminded me of the expensive lumber from Home Depot. So I quickly turned to reading many blogs and websites. After hours of looking, I found Romina Kids Furniture.
We loved the design of the Ventianni collection. Clean lines and minimalist look with all of the great features we were looking for – solid wood, eco-friendly, and solid to last for years. Next, we researched like crazy online to see if this was the one that we wanted. After looking through more blogs and websites, we decided this was the finalist. Next, we went to check this out at the only store in Minnesota that carries this brand – USA Baby. When we first drove up, I was a little skeptical. However, once inside, they have a great selection of furniture. We looked at the Romina furniture and we were sold. However, the price was a little steep, so we looked through a few more sets and decided that nothing compared to the quality and look of Romina.
We talked to the sales associate and decided that we could save quite a bit of money if we waited a month to order, but that would mean with the 10-12 week shipment timeframe, the baby might be here before we have the crib. But, we were willing to wait for this quality and as many of you know, I am a deal shopper, so I had to take advantage of a sale.


the 6 drawers chest,

the 5 drawers chest,

and a nightstand.

The nightstand will go next to the bunk beds and the kids will share the two dressers. When these arrive (hopefully only two more months), I will post pictures of these items in the bedroom.
We agreed on espresso colored furniture to tie in with the rest of our place. Since our first crib was a drop-side, we purchased a new crib. I searched high and low to find a crib that was modern, but good quality. The lesson we learned since having our son is that cribs are expensive, but usually not high quality.
I found Knock Off Wood through one of the many blogs that I read and really like these bunk beds. Initially I thought that with a little help from my husband and sisters, I would be able to build these. So we ventured to Home Depot, where I fell in love with some high quality wood, which was a little more expensive than I had budgeted. So, on to plan B – a call to my dad. Five months later, we have bunk beds that are done a thousand times better than I would have ever been able to do. I will have pictures to post soon. We are going to stain these in espresso to match the other furniture for the kids room.
Now, onto the crib. For about five seconds, I thought about building one, or having my dad build one, but that was quickly subsided when my husband reminded me of the expensive lumber from Home Depot. So I quickly turned to reading many blogs and websites. After hours of looking, I found Romina Kids Furniture.
We loved the design of the Ventianni collection. Clean lines and minimalist look with all of the great features we were looking for – solid wood, eco-friendly, and solid to last for years. Next, we researched like crazy online to see if this was the one that we wanted. After looking through more blogs and websites, we decided this was the finalist. Next, we went to check this out at the only store in Minnesota that carries this brand – USA Baby. When we first drove up, I was a little skeptical. However, once inside, they have a great selection of furniture. We looked at the Romina furniture and we were sold. However, the price was a little steep, so we looked through a few more sets and decided that nothing compared to the quality and look of Romina.
We talked to the sales associate and decided that we could save quite a bit of money if we waited a month to order, but that would mean with the 10-12 week shipment timeframe, the baby might be here before we have the crib. But, we were willing to wait for this quality and as many of you know, I am a deal shopper, so I had to take advantage of a sale.
We decided to order the crib that coverts to a twin bed,

the 6 drawers chest,

the 5 drawers chest,

and a nightstand.

The nightstand will go next to the bunk beds and the kids will share the two dressers. When these arrive (hopefully only two more months), I will post pictures of these items in the bedroom.
Wednesday, July 21, 2010
Modern Kids' Bedroom
Since we found out that number two was on the way, our first challenge was to figure out where all of the baby items would be stored. Living in the city is challenging and fun in many different ways, but one of the biggest challenges is space. We are constantly evaluating our belongings to see if there is a better way to organize or utilize space. Through this process with baby items, we replaced some items with items that can be collapsed to be stored under beds or in a closet. However, the biggest factor in being able to fit all of the items in our place was elimination. Over the last two months, we have slowly paired down our belongings through trips to Goodwill and the recycling center.
The next task was to figure out how we would decorate the kids’ room. We are lucky to have three bedrooms in the city, so we wanted to keep the third bedroom as an office, guest room and lounge all wrapped in one, so that means that the kids are sharing a bedroom.
So on to the tricky part. We don’t know if baby #2 is a girl or boy, so we need a neutral kids’ room. Over the next couple of weeks, I’ll post about the transition from plain preschool boy room to fun, modern kids’ room to suit two boys or a boy and a girl. As a sneak peak, our main color will be green (or at least that’s what we think) and we are trying to focus on organic items within our budget.
The next task was to figure out how we would decorate the kids’ room. We are lucky to have three bedrooms in the city, so we wanted to keep the third bedroom as an office, guest room and lounge all wrapped in one, so that means that the kids are sharing a bedroom.
So on to the tricky part. We don’t know if baby #2 is a girl or boy, so we need a neutral kids’ room. Over the next couple of weeks, I’ll post about the transition from plain preschool boy room to fun, modern kids’ room to suit two boys or a boy and a girl. As a sneak peak, our main color will be green (or at least that’s what we think) and we are trying to focus on organic items within our budget.
Subscribe to:
Posts (Atom)